Virtual Printer
The Virtual Printer feature allows Bambuddy to emulate one or more Bambu Lab printers on your network. This enables you to send prints directly from Bambu Studio or OrcaSlicer to Bambuddy, even without a physical printer connected.
You can create multiple virtual printers, each with its own dedicated IP address, mode, printer model, and access code. Each virtual printer runs completely independent services (FTP, MQTT, SSDP, Bind).
Overview
When enabled, each virtual printer:
- Can be discovered automatically via SSDP (same LAN) or added manually by IP (VPN, remote, Docker bridge)
- Accepts print jobs over secure TLS connections (MQTT + FTP)
- Archives prints directly, queues them for review, or adds them to the print queue
- Works with the same workflow as sending to a real Bambu Lab printer
- Runs on its own dedicated bind IP with independent services
Modes
The virtual printer supports four modes:
| Mode | Description |
|---|---|
| Immediate | Files are archived automatically when received |
| Review | Files go to pending uploads for manual review before archiving |
| Print Queue | Files are archived AND added to the print queue (unassigned). An Auto-dispatch toggle controls whether incoming prints start automatically (enabled by default) or require manual dispatch. |
| Proxy | Forwards traffic directly to a real printer (remote printing) |
The first three are server modes — Bambuddy runs its own FTP/MQTT servers and receives files locally. Proxy mode is different — Bambuddy acts as a TLS relay to a real printer.
Use Cases
- Print Archiving: Send prints to Bambuddy for archiving without starting them
- Queue Building: Build up a print queue before your printer is available
- Print Farm Preparation: Prepare jobs to distribute across multiple printers
- Remote Slicing: Slice on one computer and send to Bambuddy running elsewhere
- Remote Printing: Print from anywhere via Proxy Mode (see below)
Required Ports
Each virtual printer uses these ports on its dedicated bind IP:
| Service | Port | Protocol | Purpose |
|---|---|---|---|
| Bind | 3000, 3002 | TCP | Slicer bind/detect handshake (required for all modes) |
| SSDP | 2021 | UDP | Printer discovery (same LAN only, not needed for VPN/remote) |
| MQTT | 8883 | TCP/TLS | Printer communication |
| FTPS | 990 | TCP/TLS | File transfer control (redirected to 9990 internally) |
| FTP Data | 50000-50100 | TCP | File transfer passive data |
Dual Bind Ports
Different versions of BambuStudio and OrcaSlicer use different ports for the bind/detect handshake. Bambuddy listens on both 3000 and 3002 to support all slicer versions.
Port 990 Redirect
The FTP server listens on port 9990 internally. An iptables rule redirects external connections from port 990 (the standard FTPS port that slicers connect to) to 9990. This is required for all modes on native and Docker host-mode installs.
Certificate Installation
Required Step
The virtual printer uses TLS encryption with a self-signed CA certificate. Bambu Studio and OrcaSlicer do not use the system certificate store — you must add the certificate directly to the slicer's certificate file.
Step 1: Locate the CA Certificate
The Bambuddy CA certificate is at:
- Native install:
virtual_printer/certs/bbl_ca.crt - Docker: Extract with
docker cp bambuddy:/app/data/virtual_printer/certs/bbl_ca.crt ./bambuddy-ca.crt
Certificate Generation
The certificate is only generated when you first enable the virtual printer in the UI. If the file doesn't exist, enable the virtual printer first.
Step 2: Append the Bambuddy CA Certificate to Slicer
The slicer's printer.cer file contains PEM certificates. You need to append the Bambuddy CA certificate to this file.
Open printer.cer in a text editor and:
- Go to the end of the file
- Paste the entire contents of
bambuddy-ca.crtafter the last-----END CERTIFICATE----- - Save the file
- Fully restart the slicer (Cmd+Q on macOS, not just close the window)
Keep Original Certificates
Appending (rather than replacing) preserves your ability to connect to physical Bambu Lab printers while also enabling the virtual printer.
Certificate file locations:
- Bambu Studio:
/Applications/BambuStudio.app/Contents/Resources/cert/printer.cer - OrcaSlicer:
/Applications/OrcaSlicer.app/Contents/Resources/cert/printer.cer
- Bambu Studio:
C:\Program Files\Bambu Studio\resources\cert\printer.cer - OrcaSlicer:
C:\Program Files\OrcaSlicer\resources\cert\printer.cer
- Bambu Studio:
~/.local/share/BambuStudio/resources/cert/printer.cer - OrcaSlicer:
~/.local/share/OrcaSlicer/resources/cert/printer.cer
When to Update the Certificate
You must update the printer.cer file whenever:
- First-time setup — append the Bambuddy CA certificate
- New Bambuddy installation — each install generates a unique CA
- Switching Bambuddy hosts — each host has its own CA (unless you share the CA)
- After slicer updates — updates may restore the original certificate file, requiring you to append again
Certificate Persistence
The CA certificate is generated once and persists across Bambuddy restarts. If you switch between Docker and native installations, share the certificate directory to avoid regenerating:
Multiple Bambuddy Hosts
Each Bambuddy installation generates its own unique CA certificate.
One Bambuddy CA at a Time
When switching between Bambuddy hosts with different CAs, remove the old Bambuddy CA and append the new one. Having multiple Bambuddy CAs may cause confusion about which host to connect to.
Option 1: Share the CA (Recommended)
Copy the certs/ directory from one host to all others:
# Copy certs from host1 to host2
scp -r host1:/path/to/virtual_printer/certs/ host2:/path/to/virtual_printer/
Then restart Bambuddy on host2. All hosts will use the same CA, so one certificate in the slicer works for all.
Option 2: Update Certificate When Switching Hosts
Each time you switch to a different Bambuddy host:
- Extract the CA from the new host
- Open the slicer's
printer.cerfile - Remove the old Bambuddy CA (if present) and append the new one
- Fully restart the slicer
Platform Setup
Choose your platform below for specific setup instructions.
Linux (Native Installation)
Port 990 is a privileged port. You need iptables rules to redirect it:
# Redirect incoming traffic on port 990 to 9990
sudo iptables -t nat -A PREROUTING -p tcp --dport 990 -j REDIRECT --to-port 9990

# Redirect localhost traffic on port 990 to 9990
sudo iptables -t nat -A OUTPUT -o lo -p tcp --dport 990 -j REDIRECT --to-port 9990
Make rules persistent:
Firewall rules (if using UFW):
sudo ufw allow 3000/tcp  # Bind/detect
sudo ufw allow 3002/tcp  # Bind/detect
sudo ufw allow 2021/udp  # SSDP
sudo ufw allow 8883/tcp  # MQTT
sudo ufw allow 990/tcp   # FTPS
sudo ufw allow 9990/tcp  # FTPS internal
sudo ufw allow 50000:50100/tcp  # FTP passive data
Firewall rules (if using firewalld):
sudo firewall-cmd --permanent --add-port=3000/tcp  # Bind/detect
sudo firewall-cmd --permanent --add-port=3002/tcp  # Bind/detect
sudo firewall-cmd --permanent --add-port=2021/udp  # SSDP
sudo firewall-cmd --permanent --add-port=8883/tcp  # MQTT
sudo firewall-cmd --permanent --add-port=990/tcp   # FTPS
sudo firewall-cmd --permanent --add-port=9990/tcp  # FTPS internal
sudo firewall-cmd --permanent --add-port=50000-50100/tcp  # FTP passive data
sudo firewall-cmd --reload
Docker (Linux)
Docker requires host networking for SSDP discovery to work.
docker-compose.yml:
services:
  bambuddy:
    image: ghcr.io/maziggy/bambuddy:latest
    container_name: bambuddy
    network_mode: host  # Required for SSDP discovery
    cap_add:
      - NET_BIND_SERVICE  # Required for virtual printer proxy (port 990)
    volumes:
      - bambuddy_data:/app/data
      - bambuddy_logs:/app/logs
    environment:
      - TZ=Europe/Berlin
    restart: unless-stopped

volumes:
  bambuddy_data:
  bambuddy_logs:
You still need iptables rules on the host (for the FTP 990 → 9990 redirect):
sudo iptables -t nat -A PREROUTING -p tcp --dport 990 -j REDIRECT --to-port 9990
sudo iptables -t nat -A OUTPUT -o lo -p tcp --dport 990 -j REDIRECT --to-port 9990
Make rules persistent (Debian/Ubuntu):
Firewall rules (if using UFW):
sudo ufw allow 3000/tcp  # Bind/detect
sudo ufw allow 3002/tcp  # Bind/detect
sudo ufw allow 2021/udp  # SSDP
sudo ufw allow 8883/tcp  # MQTT
sudo ufw allow 990/tcp   # FTPS
sudo ufw allow 9990/tcp  # FTPS internal
sudo ufw allow 50000:50100/tcp  # FTP passive data
Firewall rules (if using firewalld):
sudo firewall-cmd --permanent --add-port=3000/tcp  # Bind/detect
sudo firewall-cmd --permanent --add-port=3002/tcp  # Bind/detect
sudo firewall-cmd --permanent --add-port=2021/udp  # SSDP
sudo firewall-cmd --permanent --add-port=8883/tcp  # MQTT
sudo firewall-cmd --permanent --add-port=990/tcp   # FTPS
sudo firewall-cmd --permanent --add-port=9990/tcp  # FTPS internal
sudo firewall-cmd --permanent --add-port=50000-50100/tcp  # FTP passive data
sudo firewall-cmd --reload
Docker (macOS / Windows)
Limited Support
Docker Desktop on macOS and Windows doesn't support host network mode. SSDP discovery will not work — you must add the printer manually by IP.
Use bridge networking with port mapping:
services:
  bambuddy:
    image: ghcr.io/maziggy/bambuddy:latest
    container_name: bambuddy
    cap_add:
      - NET_BIND_SERVICE
    ports:
      - "${PORT:-8000}:8000"           # Web UI
      - "3000:3000"                    # Bind/detect
      - "3002:3002"                    # Bind/detect (alt port)
      - "990:9990"                     # FTPS (host 990 → container 9990)
      - "8883:8883"                    # MQTT
      - "50000-50100:50000-50100"      # FTP passive data
    volumes:
      - bambuddy_data:/app/data
      - bambuddy_logs:/app/logs
    environment:
      - TZ=Europe/Berlin
      # Required for FTP passive mode behind Docker NAT:
      # Set to your Docker host's LAN IP
      #- VIRTUAL_PRINTER_PASV_ADDRESS=192.168.1.100
    restart: unless-stopped

volumes:
  bambuddy_data:
  bambuddy_logs:
PASV Address
When using bridge mode, FTP passive data connections need to know the host's real IP. Set VIRTUAL_PRINTER_PASV_ADDRESS to your Docker host's LAN IP address.
Unraid
-
Set Network Type to
hostin container settings -
Add iptables rules via Unraid terminal:
-
Make rules persistent by adding to
/boot/config/go:
Synology NAS
-
Use Host Network in Container Manager
-
SSH into your NAS and add iptables rules:
-
Create a scheduled task to restore rules on boot:
- Control Panel → Task Scheduler → Create → Triggered Task → User-defined script
- Event: Boot-up
- Script:
iptables -t nat -A PREROUTING -p tcp --dport 990 -j REDIRECT --to-port 9990
TrueNAS SCALE
-
Use Host Network when creating the app/container
-
Add iptables rules via shell:
Proxmox LXC
-
Enable nesting in container options (for iptables support)
-
Inside the LXC:
Configuration
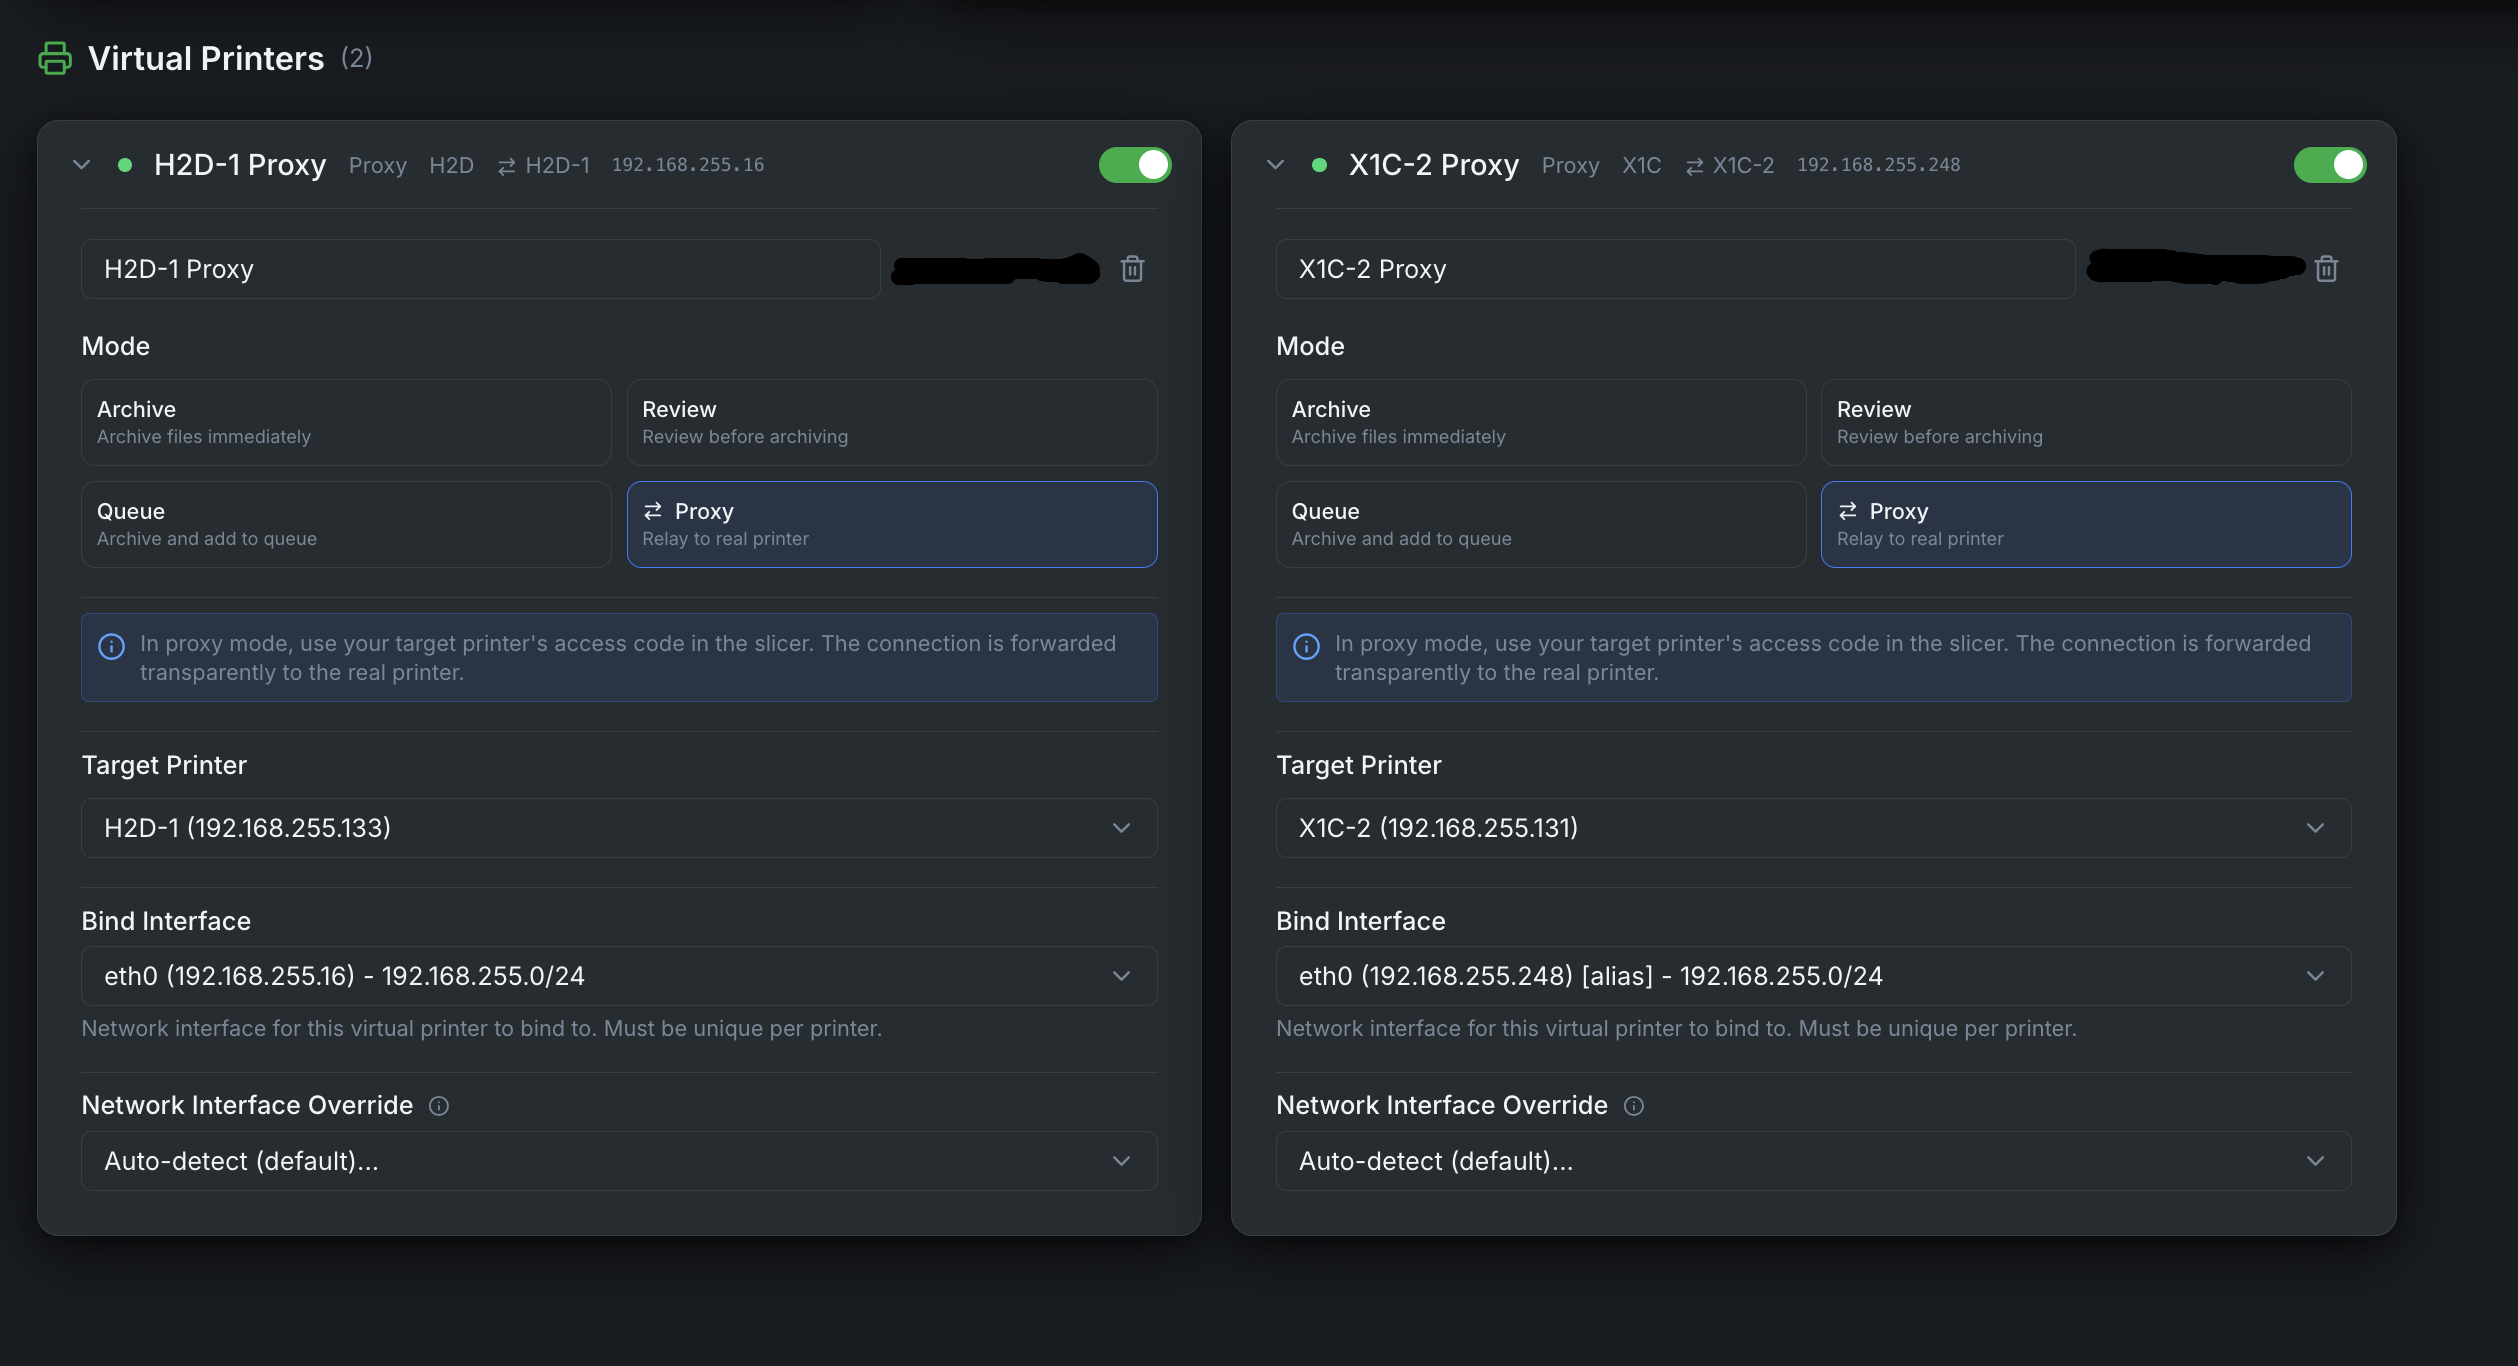
Creating a Virtual Printer
- Complete the platform setup above first
- Go to Settings in Bambuddy
- Scroll to the Virtual Printer section
- Click Add Virtual Printer
- Set a Name for this virtual printer
- Choose your Mode: Immediate, Review, Print Queue, or Proxy
- Choose the Printer Model to emulate
- Set an Access Code (exactly 8 characters) — not needed for Proxy mode
- Enter a Bind IP — a dedicated IP address for this virtual printer
- Click Create, then toggle it to Enabled
You can create multiple virtual printers, each with its own mode, model, and bind IP. They appear as separate printers in your slicer.
Dedicated Bind IP
Each virtual printer requires its own dedicated IP address. This IP is used for all services (FTP, MQTT, SSDP, Bind) and must be unique across all enabled virtual printers.
For example, if you want to run 3 virtual printers:
| IP | |
|---|---|
| Bambuddy web UI | 192.168.1.100 (your main IP) |
| Virtual Printer 1 | 192.168.1.101 |
| Virtual Printer 2 | 192.168.1.102 |
| Virtual Printer 3 | 192.168.1.103 |
You add these extra IPs as interface aliases (secondary addresses) on your network adapter. The commands below are temporary — see the persistence section for each platform to keep them across reboots.
Adding Interface Aliases
Choose Unused IPs
Pick IP addresses that are outside your DHCP range or reserve them in your router to avoid conflicts. Check with ping 192.168.1.101 before adding.
Required package
The ip command comes from the iproute2 package, which is pre-installed on most distros. If missing: sudo apt install iproute2 (Debian/Ubuntu) or sudo dnf install iproute (Fedora/RHEL).
Find your interface name first:
Add secondary IPs:
sudo ip addr add 192.168.1.101/24 dev eth0
sudo ip addr add 192.168.1.102/24 dev eth0
sudo ip addr add 192.168.1.103/24 dev eth0
Verify:
Make persistent (choose your distro):
Install netplan if not already present:
Find your existing netplan config:
Edit the file (e.g., /etc/netplan/01-netcfg.yaml) and add the addresses block:
network:
  version: 2
  ethernets:
    eth0:
      dhcp4: true
      addresses:
        - 192.168.1.101/24
        - 192.168.1.102/24
        - 192.168.1.103/24
Apply:
Install ifupdown if not already present:
Add to /etc/network/interfaces:
auto eth0:1
iface eth0:1 inet static
    address 192.168.1.101
    netmask 255.255.255.0

auto eth0:2
iface eth0:2 inet static
    address 192.168.1.102
    netmask 255.255.255.0

auto eth0:3
iface eth0:3 inet static
    address 192.168.1.103
    netmask 255.255.255.0
Apply without reboot:
NetworkManager and nmcli are pre-installed on Fedora, RHEL, and most Arch desktop installs. If missing:
Add secondary IPs to your connection:
sudo nmcli con mod "Wired connection 1" +ipv4.addresses "192.168.1.101/24"
sudo nmcli con mod "Wired connection 1" +ipv4.addresses "192.168.1.102/24"
sudo nmcli con mod "Wired connection 1" +ipv4.addresses "192.168.1.103/24"

# Apply (brief reconnect)
sudo nmcli con up "Wired connection 1"
Find your connection name
Run nmcli con show to see your connection names. Common names: "Wired connection 1", "eno1", "enp0s3".
SSH into your Unraid server or use the terminal in the web UI:
Make persistent — add to /boot/config/go:
SSH into your NAS:
Make persistent — create a triggered task:
- Control Panel → Task Scheduler → Create → Triggered Task → User-defined script
- Event: Boot-up
- User: root
- Script:
You can add aliases through the web UI:
- Network → Interfaces → Edit your interface
- Add Aliases:
192.168.1.101/24,192.168.1.102/24, etc. - Click Save and Apply
These persist automatically.
Option A — Inside the LXC container (recommended):
Use the Linux instructions above. Install iproute2 if missing:
Then add IPs and make persistent with netplan or /etc/network/interfaces.
Option B — From the Proxmox host:
Add additional network devices to the LXC config (/etc/pve/lxc/100.conf):
net0: name=eth0,bridge=vmbr0,ip=192.168.1.100/24,gw=192.168.1.1
net1: name=eth1,bridge=vmbr0,ip=192.168.1.101/24
net2: name=eth2,bridge=vmbr0,ip=192.168.1.102/24
Or via CLI:
pct set 100 -net1 name=eth1,bridge=vmbr0,ip=192.168.1.101/24
pct set 100 -net2 name=eth2,bridge=vmbr0,ip=192.168.1.102/24
Restart the container after adding network devices.
Single Virtual Printer Only
Docker Desktop on macOS and Windows uses a VM — you cannot add host interface aliases into the container. Bridge mode limits you to one virtual printer per Docker host.
For multiple virtual printers, use Linux (native or VM with host networking).
Docker Host Mode
If you're running Bambuddy in Docker with network_mode: host, add the aliases on the Docker host (not inside the container). The container inherits all host IPs automatically.
Printer Model Selection
Choose which Bambu printer model the virtual printer should emulate:
| SSDP Code | Printer | Serial Prefix |
|---|---|---|
| 3DPrinter-X1-Carbon | X1C (default) | 00M |
| 3DPrinter-X1 | X1 | 00M |
| C13 | X1E | 03W |
| C11 | P1P | 01S |
| C12 | P1S | 01P |
| N7 | P2S | 22E |
| N2S | A1 | 039 |
| N1 | A1 Mini | 030 |
| O1D | H2D | 094 |
| O1C | H2C | 094 |
| O1S | H2S | 094 |
Model Change
Changing the printer model will automatically restart the virtual printer. You may need to re-add the printer in your slicer since the serial number changes.
Network Interface Override
Multi-NIC / Docker / VPN Users
If Bambuddy has multiple network interfaces (e.g., LAN + Tailscale, Docker with multiple bridges), the auto-detected IP may be wrong. Use Network Interface Override in Virtual Printer settings to select the correct interface.
This applies to all modes and affects:
- The IP address advertised via SSDP discovery
- The IP included in the TLS certificate (SAN)
Adding to Bambu Studio / OrcaSlicer
When Does Automatic Discovery Work?
SSDP discovery only works when the slicer and Bambuddy are on the same network segment (same LAN/subnet). You must add the printer manually by IP when:
- Connecting over a VPN (WireGuard, Tailscale, etc.)
- Using Docker bridge mode (macOS/Windows)
- Connecting over the internet via port forwarding
- The slicer is on a different subnet than Bambuddy
Automatic Discovery
- Ensure the virtual printer is enabled and running
- In Bambu Studio/OrcaSlicer, go to Device tab
- Click Refresh or wait for discovery
- The virtual printer "Bambuddy" should appear
- Click to add it, entering the access code when prompted
Manual Addition (Bind with Access Code)
If automatic discovery doesn't work (VPN, remote, bridge mode):
- In Bambu Studio, go to Device → Add Printer
- Select Add printer by IP (or Bind with access code)
- Enter the IP address of your Bambuddy server
- Enter the access code (8 characters)
- The printer will be added to your device list
Bind/Detect Ports Required
The "bind with access code" handshake uses port 3000 or 3002 (depending on your slicer version). Bambuddy listens on both. Make sure these ports are reachable from the slicer (firewall, port forwarding, Docker port mapping).
Sending Prints to Bambuddy
Server Modes (Immediate / Review / Print Queue)
Use Send, Not Print
You must use the Send button, not the Print button!
- Send → Transfers the file to Bambuddy (correct)
- Print → Attempts to start printing immediately (won't work — there's no real printer)
- Slice your model as usual
- Select "Bambuddy" from the printer dropdown
- Click the Send button (next to the Print button)
- The file will be transferred to Bambuddy

What Happens Next:
- Immediate: The file is automatically archived
- Review: The file appears in Pending Uploads for you to review, assign to a project, add notes, or queue for printing
- Print Queue: The file is archived and added to the print queue as an unassigned job
Send Button Location
In Bambu Studio/OrcaSlicer, the Send button is typically a small icon next to the large Print button, or accessible via the dropdown arrow on the Print button.
Proxy Mode
In Proxy mode, you use the slicer normally — slice, select the printer, and click Print or Send just like you would with a local printer. Bambuddy relays everything to the real printer transparently.
Proxy Mode — Remote Printing
NEW FEATURE
Proxy Mode enables remote printing from anywhere in the world through a secure TLS relay.
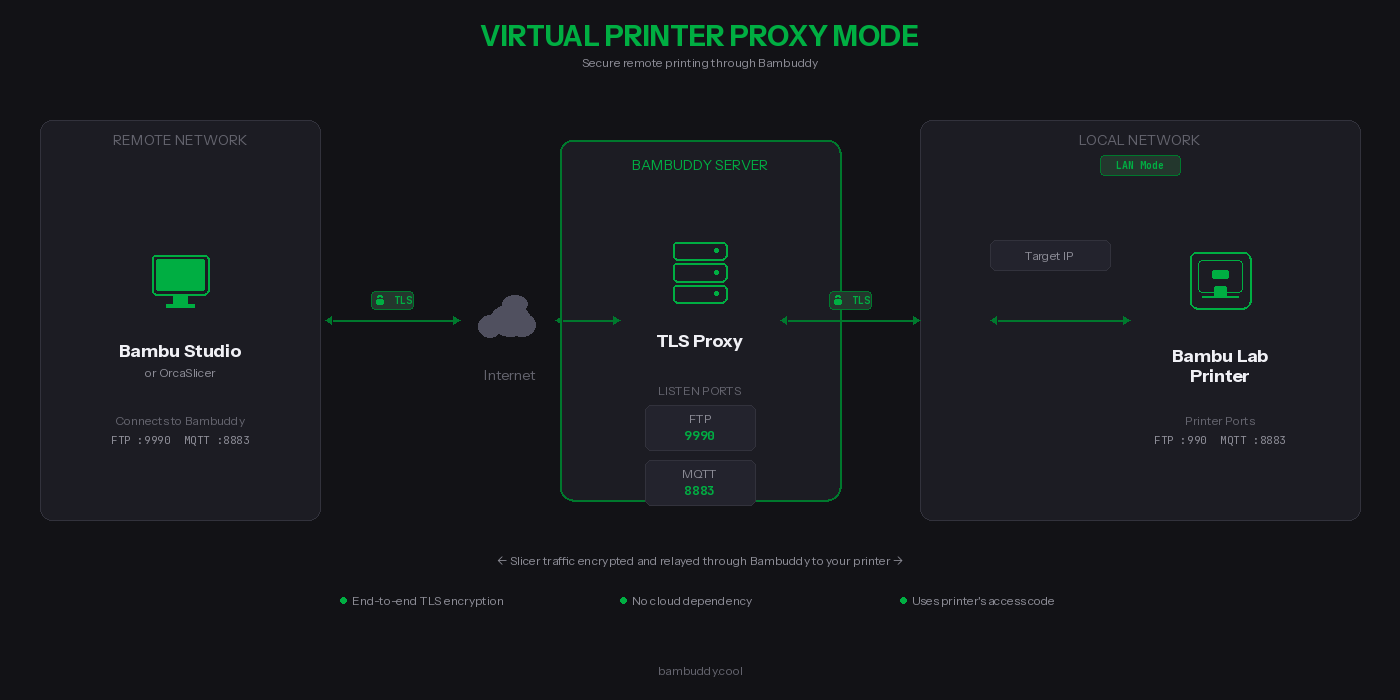
What is Proxy Mode?
Unlike the server modes that archive files locally, Proxy Mode forwards your print jobs directly to a real Bambu Lab printer. Bambuddy acts as a secure relay between your slicer and your printer.
How It Works
- Select the target printer in Bambuddy settings (must be in LAN mode)
- For cross-network: select the slicer network interface for SSDP relay
- Enable the proxy — printer appears in slicer discovery via SSDP
- Connect using the printer's access code
- Print as normal — traffic is relayed through Bambuddy
Proxy Mode Ports
| Protocol | Bambuddy Listen Port | Printer Port | Purpose |
|---|---|---|---|
| Bind | 3000, 3002 | 3000, 3002 | Slicer bind/detect handshake |
| FTP/FTPS | 990 | 990 | File transfer control (TLS) |
| FTP Data | 50000-50100 | dynamic | File transfer data |
| MQTT/TLS | 8883 | 8883 | Printer control & status (TLS) |
Key Benefits
| Feature | Description |
|---|---|
 TLS-encrypted control channels TLS-encrypted control channels | MQTT and FTP control fully encrypted; use VPN for data channel |
 No cloud dependency No cloud dependency | Your data never touches third-party servers |
 Uses printer's credentials Uses printer's credentials | No additional passwords — use your printer's access code |
 Full protocol support Full protocol support | FTP, MQTT, and bind protocol are all proxied |
 Connection monitoring Connection monitoring | Real-time status showing active connections |
FTP Data Channel Security
Bambu Studio's FTP implementation does not encrypt the data channel — even though it negotiates PROT P (encrypted), it sends file data in cleartext. The MQTT control channel (commands, status) is fully TLS-encrypted.
What this means: Your 3MF print files are transferred unencrypted between the slicer and Bambuddy. Between Bambuddy and your printer, the data channel encryption depends on the printer model (some use PROT P, some use PROT C).
Recommendation: When using Proxy Mode over the internet, place a VPN (WireGuard, Tailscale, or similar) between your slicer and Bambuddy to protect the FTP data channel.
Requirements
Printer Requirements:
- Bambu Lab printer in LAN Mode (Developer Mode)
- Printer must be accessible from Bambuddy on your local network
- Printer's IP address and access code
Network Requirements:
- Bambuddy server accessible from the slicer (same LAN, VPN, or internet)
- Ports 3000 + 3002 (bind), 990 (FTP), 8883 (MQTT), and 50000-50100 (FTP data) reachable from the slicer
- Static IP or dynamic DNS for your Bambuddy server (if remote)
Supported Network Configurations:
| Setup | SSDP Discovery | Manual Add | Notes |
|---|---|---|---|
| Same LAN | Automatic | Yes | SSDP broadcast reaches slicer directly |
| Dual-homed (2 NICs) | Automatic | Yes | Use Network Interface Override to select correct NIC |
| Docker host mode (Linux) | Automatic | Yes | Host networking passes SSDP traffic |
| Docker bridge mode | Not available | Required | Bridge networking blocks UDP multicast |
| VPN (WireGuard/Tailscale) | Not available | Required | VPN tunnels don't carry UDP multicast |
| Port forwarding / internet | Not available | Required | SSDP is local-network only |
Setting Up Proxy Mode
Step 1: Complete Platform Setup
Make sure you've completed the Platform Setup for your installation (iptables rules, firewall ports, Docker config).
Step 2: Configure Remote Access (if needed)
To access from outside your home network, forward these ports on your router:
| External Port | Internal Port | Protocol | Destination |
|---|---|---|---|
| 3000 | 3000 | TCP | Bambuddy server IP |
| 3002 | 3002 | TCP | Bambuddy server IP |
| 990 | 990 | TCP | Bambuddy server IP |
| 8883 | 8883 | TCP | Bambuddy server IP |
| 50000-50100 | 50000-50100 | TCP | Bambuddy server IP |
Recommended: Use a VPN
For best security, use a VPN like Tailscale or WireGuard between your slicer and Bambuddy. This encrypts all traffic including the FTP data channel (see security note above).
Other options:
- Cloudflare Tunnel — Free tunneling (TCP passthrough for ports 3000, 3002, 990, 8883, 50000-50100)
- nginx/Caddy/Traefik — Reverse proxy for web UI only; FTP/MQTT/bind need direct access
Security Note
These ports will be exposed to the internet. The MQTT and FTP control channels are protected by TLS encryption and your printer's access code. The FTP data channel is not encrypted on the slicer side — use a VPN for full encryption.
Step 3: Enable Proxy Mode in Bambuddy
- Go to Settings → Virtual Printer
- Select Proxy mode from the mode options
- Select your Target Printer from the dropdown
- Click the toggle to Enable Virtual Printer
- Verify the status shows "Running" with the proxy ports
Step 4: Configure Your Slicer
In Bambu Studio or OrcaSlicer:
- Go to Device → Add Printer → Add printer manually
- Enter your Bambuddy server's IP or hostname
- Enter your printer's access code (not a Bambuddy password)
- The printer should connect and show as online
Step 5: Print!
Select a model, slice it, and click Print. The job will be:
- Sent to Bambuddy (encrypted via TLS)
- Relayed to your printer on the local network
- Started on your printer just like a local print
Dual-Homed (Cross-Network) Setup
For setups where Bambuddy has interfaces on two networks (e.g., printer on LAN A, slicer on LAN B):
- Enable the virtual printer, then select the slicer-facing interface under Network Interface Override
- Bambuddy will re-broadcast printer SSDP on the slicer's network
- The slicer discovers the printer automatically via SSDP
- Camera streaming requires additional NAT/iptables rules (RTSP port 322)
Proxy Mode vs Server Modes
| Feature | Immediate | Review | Print Queue | Proxy |
|---|---|---|---|---|
| Files stored locally | Yes | Yes | Yes | No |
| Sends to real printer | No | No | No | Yes |
| Remote printing | No | No | No | Yes |
| Requires target printer | No | No | No | Yes |
| Uses printer's access code | No | No | No | Yes |
| Requires Bambuddy access code | Yes | Yes | Yes | No |
Troubleshooting
Slicer Can't Find or Connect to Virtual Printer
- Check virtual printer is enabled and showing "Running" status in Bambuddy Settings
- Verify bind/detect ports are reachable — the slicer needs port 3000 or 3002 for the handshake:
- Check iptables rules are active (for FTP):
- Check firewall — ports 3000/tcp, 3002/tcp, 2021/udp, 8883/tcp, 990/tcp, 50000-50100/tcp must be open
- Same network? — SSDP discovery only works on the same LAN/subnet. Use "bind with access code" for VPN, remote, or Docker bridge setups
FTP Error / Connection Reset
- Verify iptables rules are correctly configured (990 → 9990 redirect)
- Check permissions on the uploads directory
- Check no other FTP server is using port 990 or 9990
- Review logs for specific error messages
"Wrong Printer Model" Error
The slicer's selected printer profile must match the virtual printer model in Bambuddy settings.
Permission Denied Errors
If you see "Permission denied" in the logs:
# Fix ownership of the virtual printer directory
sudo chown -R $(whoami):$(whoami) /path/to/bambuddy/data/virtual_printer
Authentication Failed
- Verify access code matches in both Bambuddy and slicer
- Access code must be exactly 8 characters
- Try removing and re-adding the printer in your slicer
Wrong IP in SSDP / TLS Handshake Fails (Multi-NIC)
If Bambuddy has multiple network interfaces (LAN + VPN, Docker bridges, etc.), the auto-detected IP may be on the wrong interface:
- Go to Settings → Virtual Printer
- Enable the virtual printer if not already enabled
- Under Network Interface Override, select the interface your slicer connects through
- The virtual printer will restart with the correct IP in SSDP broadcasts and TLS certificate
TLS Connection Failed / Error -1
This typically means the slicer doesn't trust the virtual printer's certificate:
-
Verify Bambuddy CA is in slicer's certificate file:
The count should be higher than a stock install (stock has 1 certificate). -
Wrong certificate? If you have multiple Bambuddy hosts or reinstalled, you must update the certificate. See Step 2.
-
Verify certificate fingerprints match:
Verify this fingerprint appears in one of the certificates in your slicer's# On Bambuddy server (Docker) docker exec bambuddy openssl x509 -in /app/data/virtual_printer/certs/bbl_ca.crt -noout -fingerprint -sha1 # On Bambuddy server (native) openssl x509 -in virtual_printer/certs/bbl_ca.crt -noout -fingerprint -sha1printer.cer. -
Fully restart the slicer — Cmd+Q on macOS, or End Task on Windows. Just closing the window is not enough.
-
Regenerate certificates (last resort):
You'll need to remove the old Bambuddy CA from the slicer and append the new one.
Proxy Mode: Printer Shows Offline in Slicer
- Verify the target printer is online in Bambuddy
- Check that the printer is in LAN mode
- Restart the proxy by toggling it off and on
Proxy Mode: Connection Drops During Transfer
- Large files may timeout on slow connections
- Check your internet upload speed
Technical Details
Security
- Bind protocol (ports 3000, 3002): Unencrypted TCP — transmits printer identity only, no sensitive data
- MQTT control channel: Fully TLS-encrypted (TLS 1.2)
- FTP control channel: Fully TLS-encrypted (implicit FTPS, TLS 1.2)
- FTP data channel: In proxy mode, encrypted between Bambuddy and printer (depends on printer model). Not encrypted between slicer and Bambuddy due to a Bambu Studio limitation. Use a VPN for end-to-end data encryption.
- Self-signed certificates are auto-generated (shared CA persists, per-instance device cert regenerates per serial)
- Access code authentication required for all connections (8 characters)
- Certificates stored in
virtual_printer/certs/(shared CA) andvirtual_printer/certs/{id}/(per-instance certs)
Limitations
- Each virtual printer requires its own dedicated bind IP address
- SSDP discovery requires same LAN — use manual IP entry for VPN, remote, or Docker bridge setups
- Slicer must trust the self-signed certificate (see Certificate Installation)
- FTP data channel unencrypted on slicer side (use VPN for full encryption)