Spool Inventory
Bambuddy includes a built-in spool inventory system to track your filament collection, assign spools to AMS slots, and automatically monitor filament consumption.
Inventory Overview
The Spool Inventory page shows all your spools in a searchable, filterable table with summary statistics.
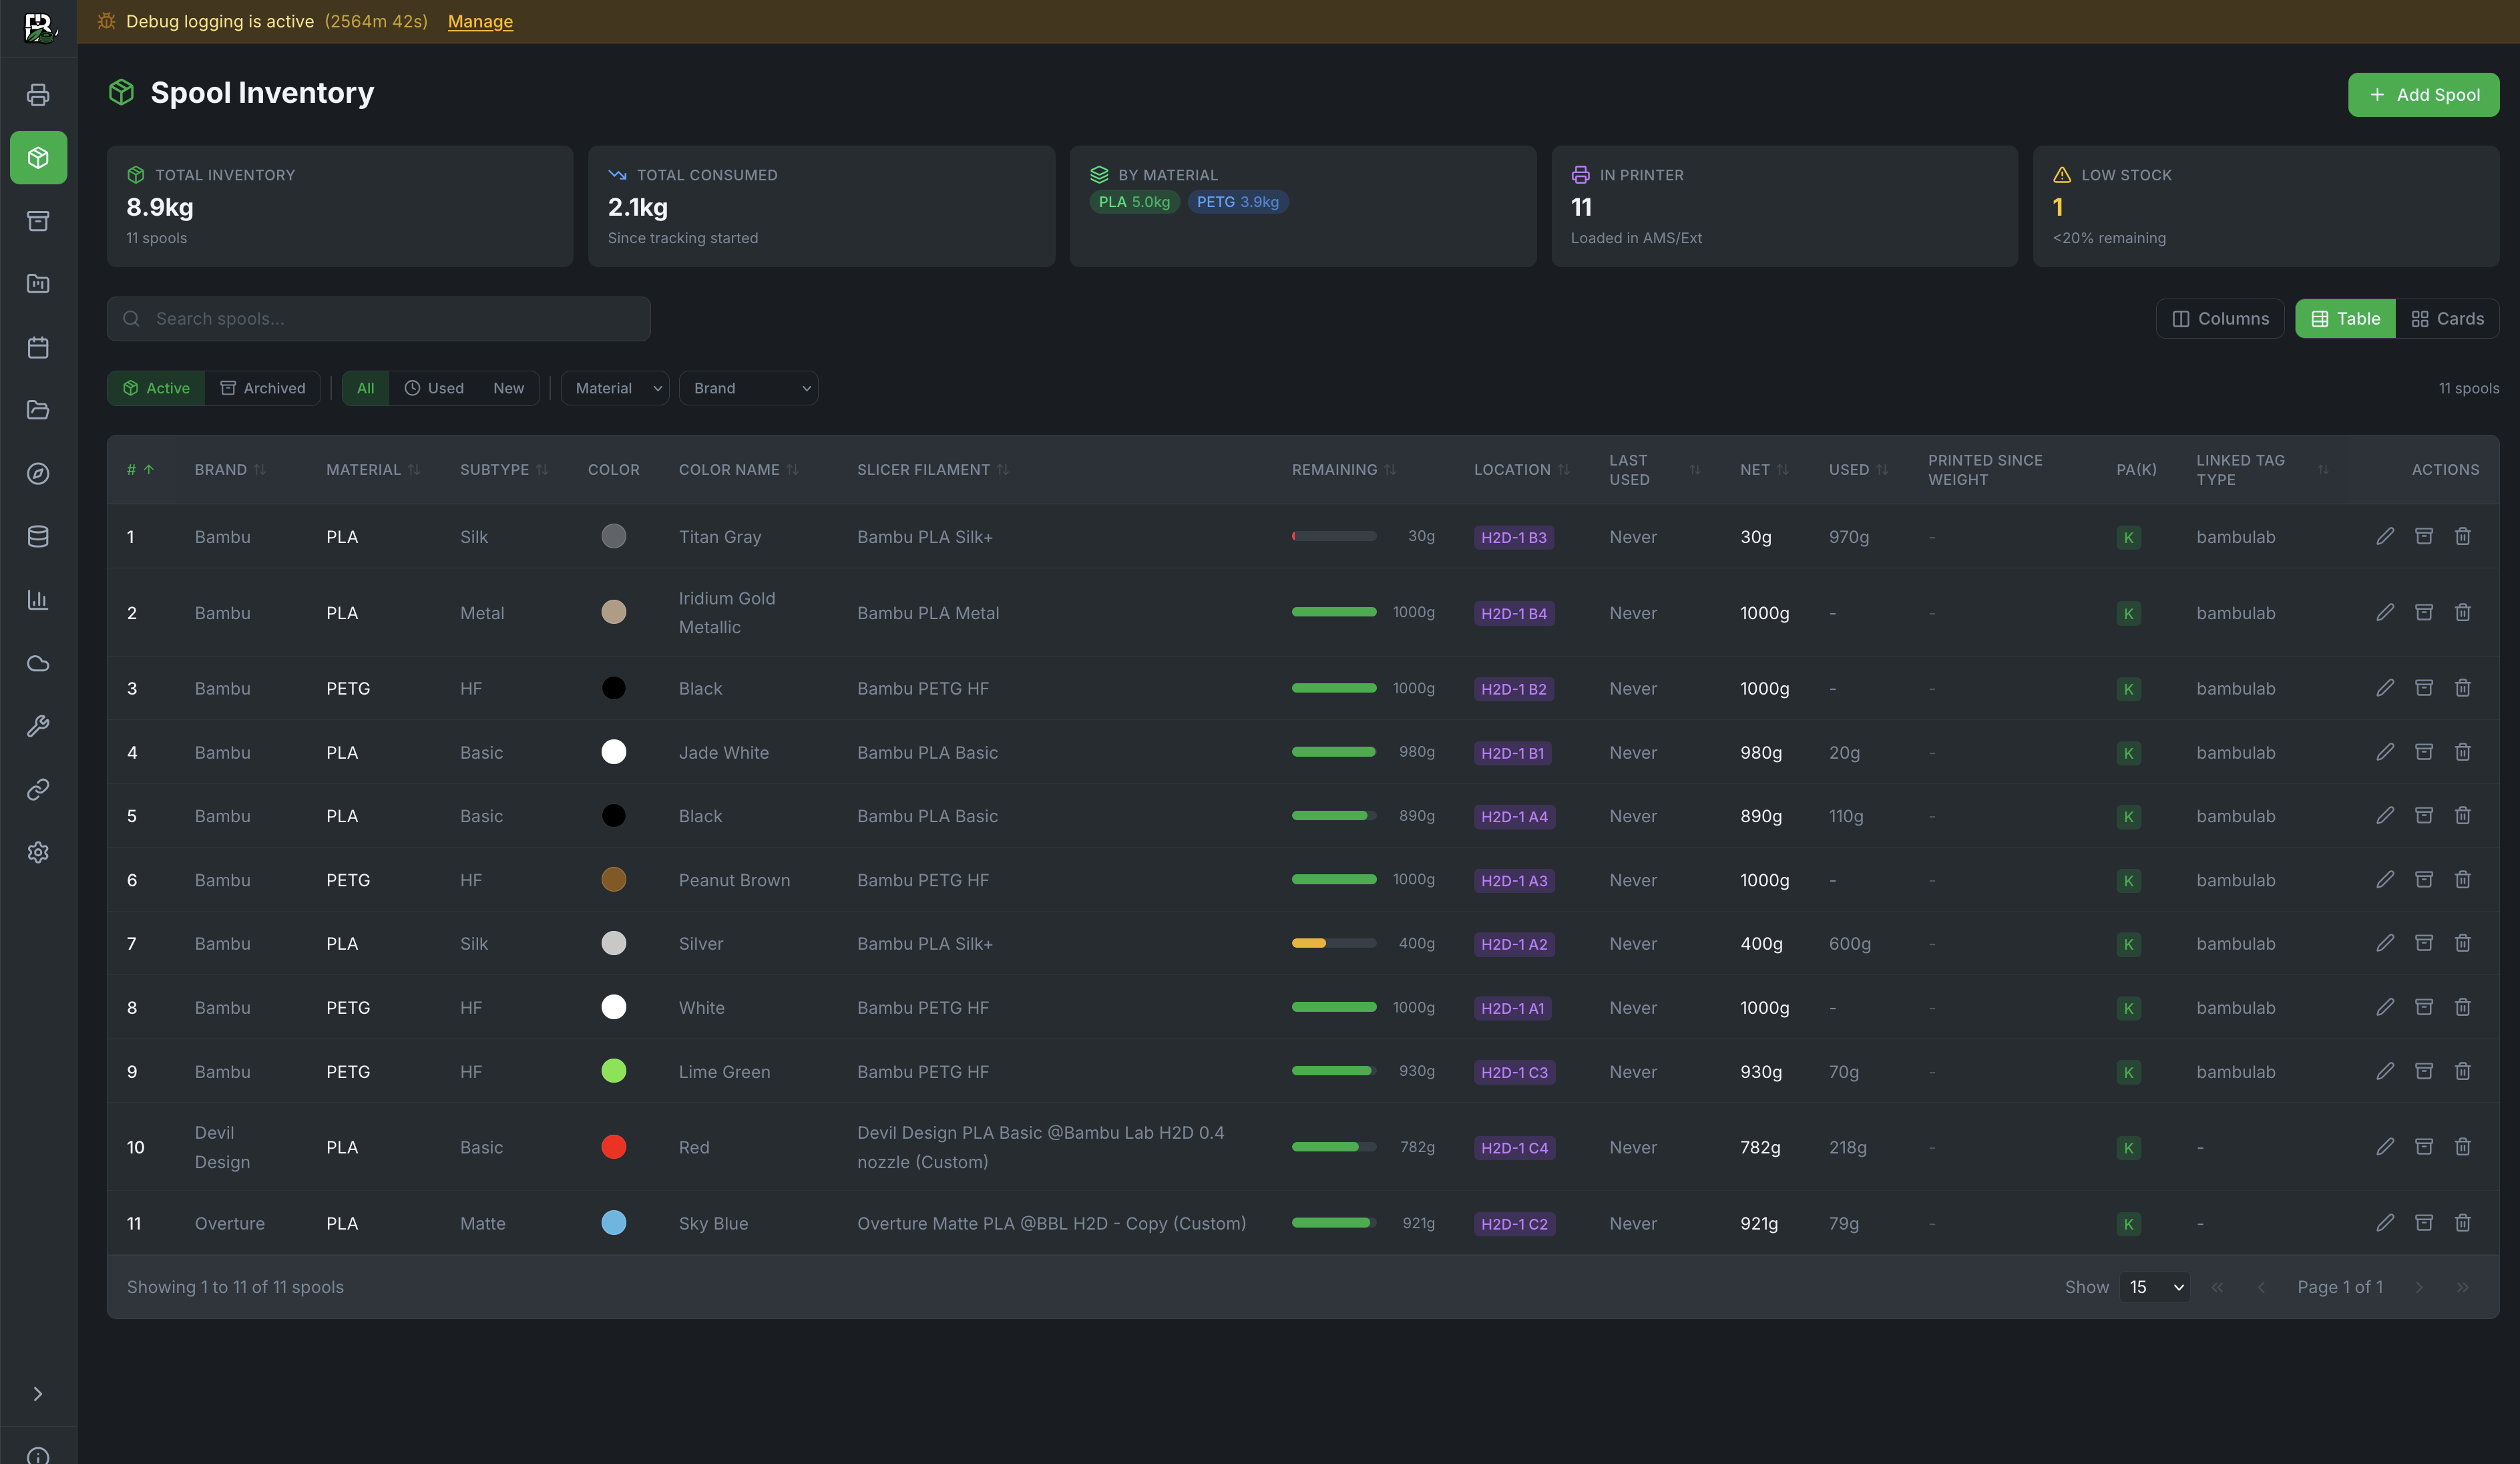
Summary Cards
| Card | Description |
|---|---|
| Total Inventory | Total filament weight across all spools |
| Total Consumed | Total filament used since tracking started |
| By Material | Breakdown by filament type (PLA, PETG, etc.) |
| In Printer | Number of spools currently loaded in AMS slots |
| Low Stock | Spools with less than 20% remaining |
Filtering & Search
- Status tabs: Active, Archived, All
- Quick filters: Used, New
- Stock filter: All, Stock (no slicer profile), Configured (has slicer profile)
- Dropdowns: Filter by Material, Brand
- Search: Find spools by name, brand, material, or color
- View modes: Table or Cards
- Group similar: Toggle to visually collapse identical unused/unassigned spools into a single expandable row or card with a count badge (e.g., "5 identical spools"). Spools are grouped by material, subtype, brand, color, and label weight. Used or AMS-assigned spools always appear individually. Group state persists across sessions.
Adding Spools
Click + Add Spool to create a new inventory entry.
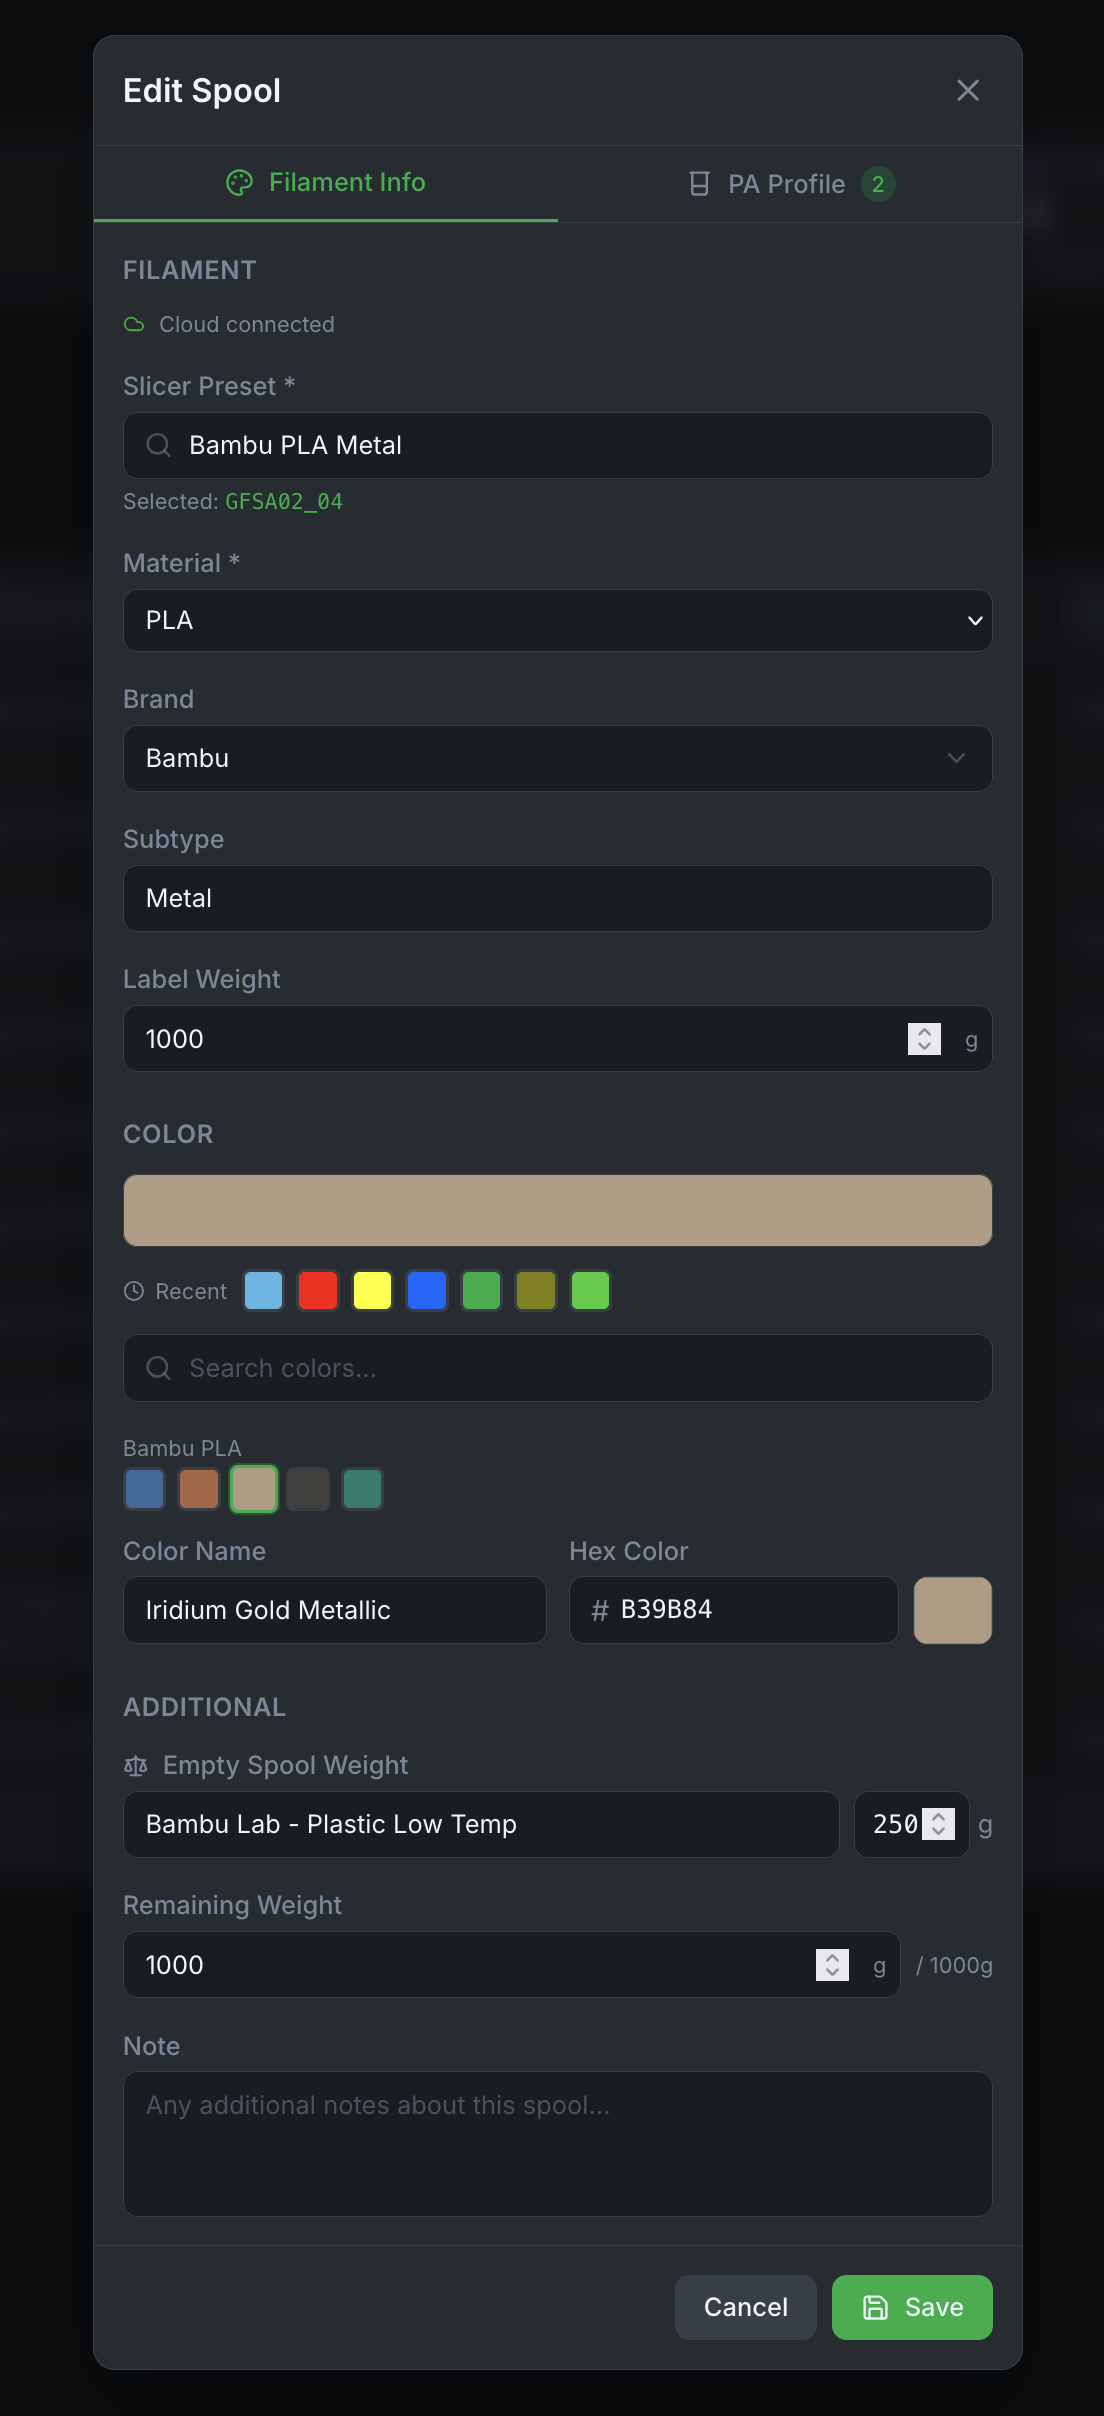
Filament Info Tab
| Field | Description |
|---|---|
| Slicer Preset | Search and select a filament profile (see Where Presets Come From below) |
| Material | PLA, PETG, ABS, ASA, TPU, etc. (see Custom Materials below) |
| Brand | Filament manufacturer |
| Subtype | Basic, Matte, Silk, HF, Metal, etc. |
| Label Weight | Net weight as printed on the spool (default: 1000g) |
| Quantity | Number of identical spools to create (1–100, default: 1) |
| Color | Visual color picker with recent colors, brand palettes, and hex input |
Quick Add (Stock Spools)
Toggle Quick Add (Stock) at the top of the spool form to switch to a simplified mode. This hides the slicer preset and the PA Profile tab — only Material (required), Brand, Subtype (both optional), Label Weight, Quantity, and Color are shown.
Use Quick Add when you want to inventory filament without picking a specific slicer profile. These are called "stock" spools — they track weight and usage like any other spool, but they aren't linked to a printer filament profile. You can always edit a stock spool later to assign a slicer preset, at which point it becomes a "configured" spool.
Bulk Buying
Set the Quantity field to create multiple identical spools at once — for example, if you bought a 5-pack of PLA. All spools are created in a single operation with the same material, color, weight, and other settings. The quantity field is only available in Quick Add mode.
Group Similar Spools
After adding multiple identical spools, use the Group toggle in the inventory toolbar to collapse them into a single row with a count badge. This keeps your inventory clean when you have many spools of the same filament. Click a group to expand and see individual spools.
Where Presets Come From
The Slicer Preset dropdown merges filament profiles from three sources, checked in order:
| Source | Badge | Description |
|---|---|---|
| Bambu Cloud | — | Your personal cloud presets synced from BambuStudio. Includes both Bambu's official presets and any custom presets you've created (e.g., "# Overture Matte PLA @BBL P1S"). Requires Cloud Profiles login. |
| Local Profiles | Local (green) | OrcaSlicer presets you've imported via Local Profiles. Useful if you don't use Bambu Cloud. |
| Built-in Fallback | Built-in (amber) | A static table of ~150 Bambu Lab filament IDs (PLA Basic, PETG HF, ABS, etc.). Always available, no login needed. |
Presets from all three sources are merged and deduplicated. If cloud login fails, local + built-in presets still appear — the preset list is never empty.
Selecting a preset auto-fills the Material, Brand, and Subtype fields from the preset name, saving you from filling them manually.
Inventory vs AMS Slot Configuration
The spool inventory is for tracking your filament collection — every spool you own, regardless of whether it's loaded in a printer. You can inventory a spool of PETG sitting on a shelf even if no printer is currently using it.
AMS Slot Configuration (see below) is a separate action: it tells the printer what filament profile to use for a specific slot. The two features work together but serve different purposes.
Custom Materials
The material dropdown includes common types: PLA, PETG, ABS, TPU, ASA, PC, PA, PVA, HIPS, PA-CF, PETG-CF, and PLA-CF.
If your material isn't listed (e.g., PCTG, PHA, PP, PVDF), simply type it into the Material field. A "Use custom material" option will appear at the bottom of the dropdown — click it to use your custom material type.
Custom materials work just like built-in ones for inventory tracking, usage history, and filtering.
Example: Adding 3D-Fuel PCTG Pro
- Click + Add Spool
- In Slicer Preset, search for your closest PETG preset (PCTG is a PETG variant). If you have a custom OrcaSlicer profile for PCTG, import it via Local Profiles first and it will appear here.
- In Material, type
PCTGand click "Use custom material: PCTG" - In Brand, type
3D-Fuel - In Subtype, type
Pro - Set the color, label weight, and save
Additional Section
| Field | Description |
|---|---|
| Empty Spool Weight | Select from the spool catalog or enter manually (for accurate remaining calculations) |
| Remaining Weight | Current filament remaining — shows label_weight - weight_used with a reference maximum |
| Note | Free-text notes about the spool |
PA Profile Tab
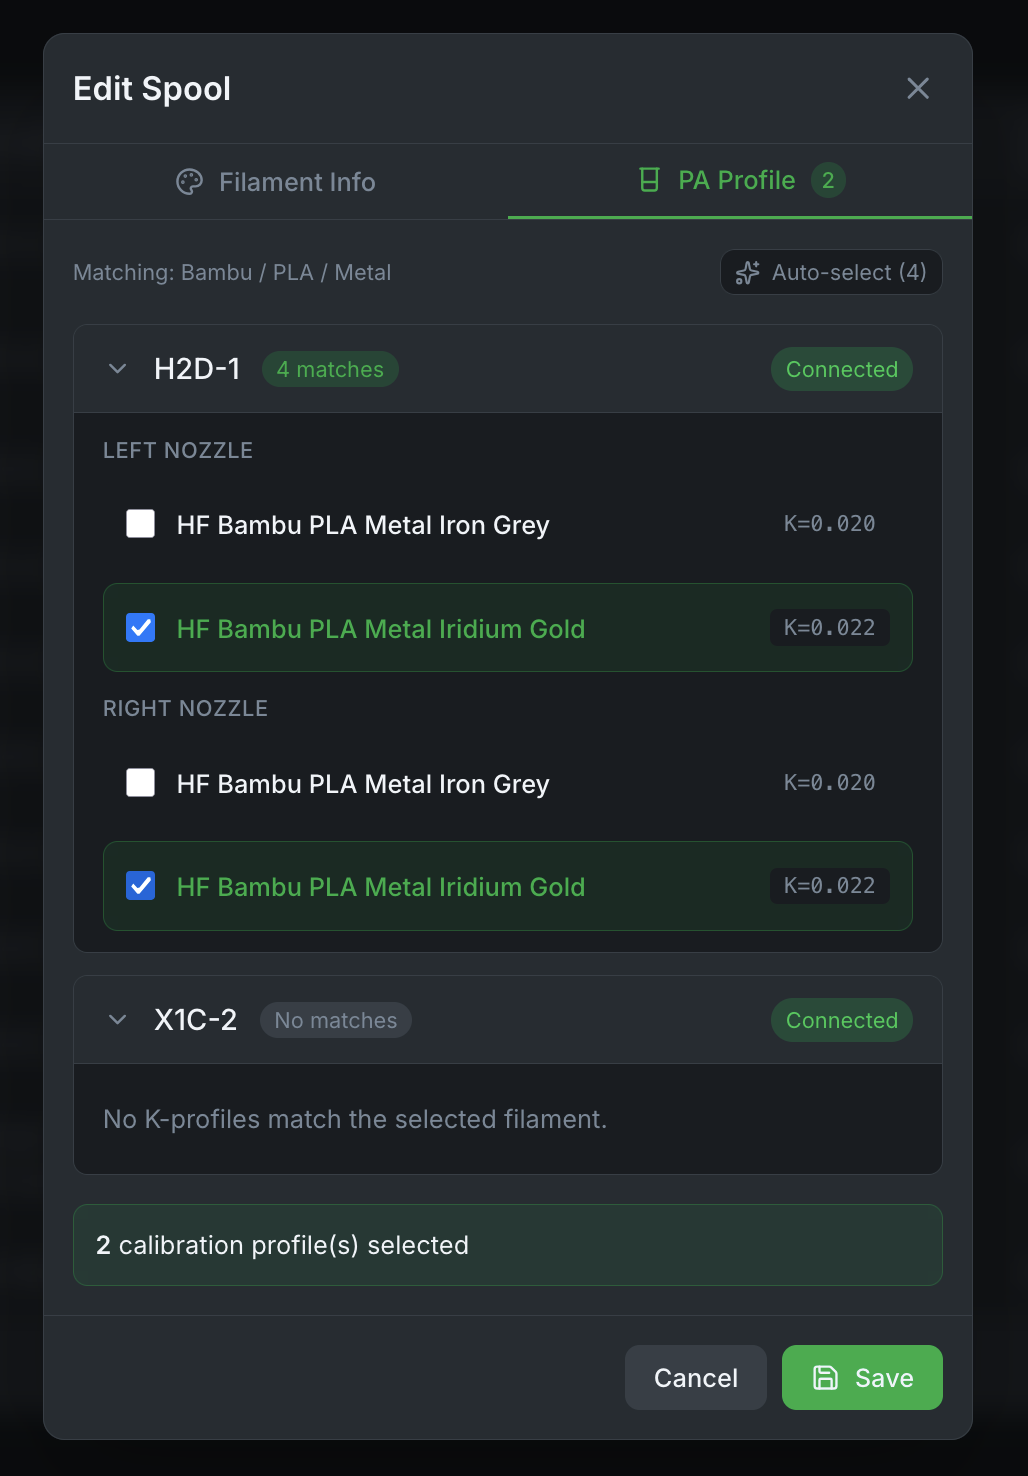
Link pressure advance (K-factor) calibration profiles to the spool:
- Auto-select matches profiles by brand, material, and subtype
- Shows matches grouped by printer and nozzle (left/right for dual-nozzle)
- K-factor values displayed for quick reference
AMS Slot Assignment
Assign inventory spools to AMS slots to track which filament is loaded where.
Assigning a Spool
- Hover over any AMS slot on the printer card (empty or configured, non-Bambu-Lab)
- Click Assign Spool in the hover card
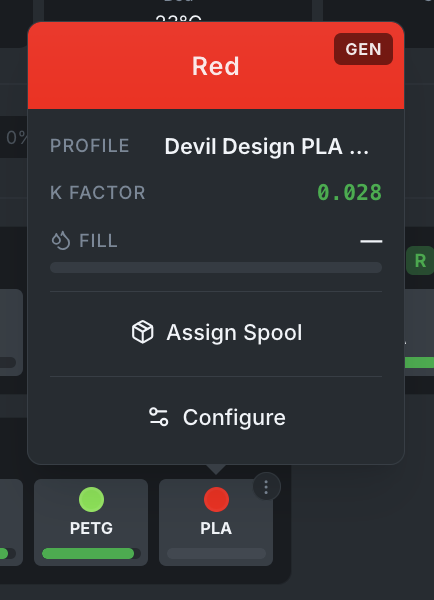
- Select a spool from the filtered list
- Click Assign Spool to confirm
The assign modal automatically:
- Filters out Bambu Lab spools — these are tracked via RFID and managed by the AMS
- Filters out already-assigned spools — each spool can only be in one slot at a time
- Shows only manually added (non-BL) spools
Unassigning a Spool
- Hover over an assigned AMS slot
- Click Unassign in the hover card
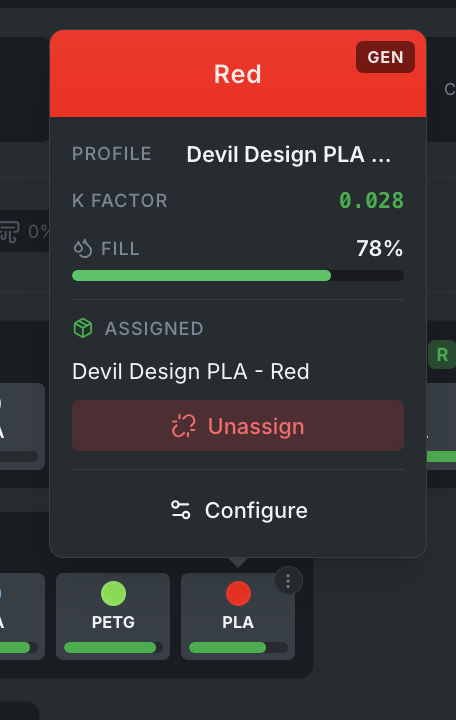
Bambu Lab Spools
Slots containing Bambu Lab spools (identified by RFID) do not show assign/unassign buttons. These spools are managed automatically by the AMS.
Auto-Unlink
When a Bambu Lab spool is inserted into a slot that has a manual spool assignment, the assignment is automatically removed.
Stable Assignments on Startup
Spool assignments are preserved across Bambuddy restarts. If the same spool is still in the slot (verified by RFID identifiers), the assignment is kept without sending any commands to the printer.
Configure AMS Slot
AMS slot configuration tells the printer what filament profile to use for a specific slot. This is separate from inventory — it controls how the printer handles the filament during printing (temperature, flow rate, pressure advance, etc.).
- Hover over an AMS slot on the printer card
- Click the menu button ()
- Select Configure Slot
- Choose a filament preset
- Optionally select a K profile and custom color
- Click Configure Slot to apply
When to Configure vs When to Assign
- Assign Spool: Links an inventory spool to a slot for tracking (weight, usage history, cost) and automatically configures the slot with the spool's filament profile, color, and K-profile. Works on both configured and empty slots.
- Configure Slot: Manually sends a specific filament profile to the printer. Useful when you want to override the auto-configured settings or set up a slot without an inventory spool.
Where Configure Slot Presets Come From
The preset list in the Configure Slot modal comes from the same three sources as the spool form, but filtered by printer model:
| Source | Description |
|---|---|
| Bambu Cloud | Cloud presets filtered by model suffix (e.g., @BBL P1S, @BBL H2D). Custom presets you created in BambuStudio appear here with a Custom badge. |
| Local Profiles | OrcaSlicer imports filtered by compatible_printers. |
| Built-in Fallback | Bambu Lab's filament catalog (~150 entries). Always available. |
Only presets compatible with the specific printer model are shown, reducing clutter and preventing mismatches.
User Presets
User presets that inherit from Bambu presets (e.g., "# Overture Matte PLA @BBL H2D") are fully supported. Bambuddy automatically derives the correct filament ID from the preset's base configuration.
Usage Tracking
Bambuddy tracks filament consumption automatically using 3MF slicer data as the primary source for all spools.
3MF Slicer Estimates (Primary)
For all spools — both Bambu Lab (RFID) and third-party — Bambuddy uses the per-filament used_g data from the archived 3MF file:
- Extracts per-filament usage from the slicer's slice_info
- Maps 3MF filament slots to physical AMS trays using the actual AMS mapping from the print command
- For slicer-initiated prints (BambuStudio, OrcaSlicer, Bambu Handy): captures the
ams_mappingdirectly from the MQTT print command, ensuring the correct tray is tracked regardless of which application starts the print - For queue prints: uses the stored AMS mapping for exact slot-to-tray resolution
- For single-filament prints: uses the printer's active tray for reliable tracking
- For completed prints: uses the full slicer estimate
- For failed/aborted prints: uses per-layer G-code data for accurate partial tracking, with linear progress scaling as fallback
AMS Remain% Delta (Fallback)
When 3MF data is unavailable (e.g., G-code-only prints without an archived 3MF file), Bambuddy falls back to AMS remain% tracking:
- Captures remain% at print start and end to compute consumption deltas
- Only used for trays not already tracked via 3MF
Accuracy
3MF estimates come from the slicer and are very accurate for completed prints. For partial prints, per-layer G-code analysis provides precise filament consumption up to the exact layer where the print stopped. If layer data is unavailable, a linear estimate (total × progress%) is used as a final fallback.
Usage History
Each consumption event is recorded with:
- Spool ID and printer
- Print name
- Weight consumed (grams)
- Percentage consumed
- Print status (completed / failed / aborted)
- Cost (calculated from spool cost/kg)
Cost Tracking
Track filament costs per spool and see cost breakdowns for every print.
Setting Cost Per Kg
Each spool can have an individual Cost per kg value, set in the Additional section of the spool form. This value is used to calculate the cost of each print based on actual filament consumption.
How Cost Calculation Works
When a print completes, Bambuddy calculates the cost for each spool used:
- Per-spool cost: Uses the spool's
cost_per_kgif set - Default fallback: Uses the global Default Filament Cost from Settings → Filament
- Formula:
cost = (weight_used_grams / 1000) × cost_per_kg
The calculated cost is stored in the usage history record and aggregated to the archive's total cost.
Cost Display
- Print modal: Shows a real-time cost preview based on loaded filaments and their cost/kg values before starting a print
- Archive cards: Display the total filament cost for each print
- Inventory table: Includes a sortable "Cost/kg" column (hidden by default — enable via column settings)
- Statistics: Total cost across all prints is included in the stats summary
Recalculating Costs
If you update spool prices or add cost data retroactively, use Recalculate Costs on the Archives page to update all archive costs based on current filament prices. This recalculates costs using:
- Spool usage history records (by archive ID)
- Legacy usage records (by print name, for older records)
- Filament catalog prices (if no usage records exist)
Default Filament Cost & Currency
Configure in Settings → Filament:
| Setting | Description |
|---|---|
| Default Filament Cost | Fallback cost per kg when a spool doesn't have an individual cost set (default: 25.00) |
| Currency | Currency symbol used for cost display throughout the app (USD, EUR, GBP, MYR, and 23 more) |
Set Costs on Your Spools
For the most accurate cost tracking, set cost_per_kg on each spool when you add it to inventory. The default cost is a rough estimate — individual spool prices give you precise per-print cost data.
Settings
Configure the inventory system in Settings > Filament.
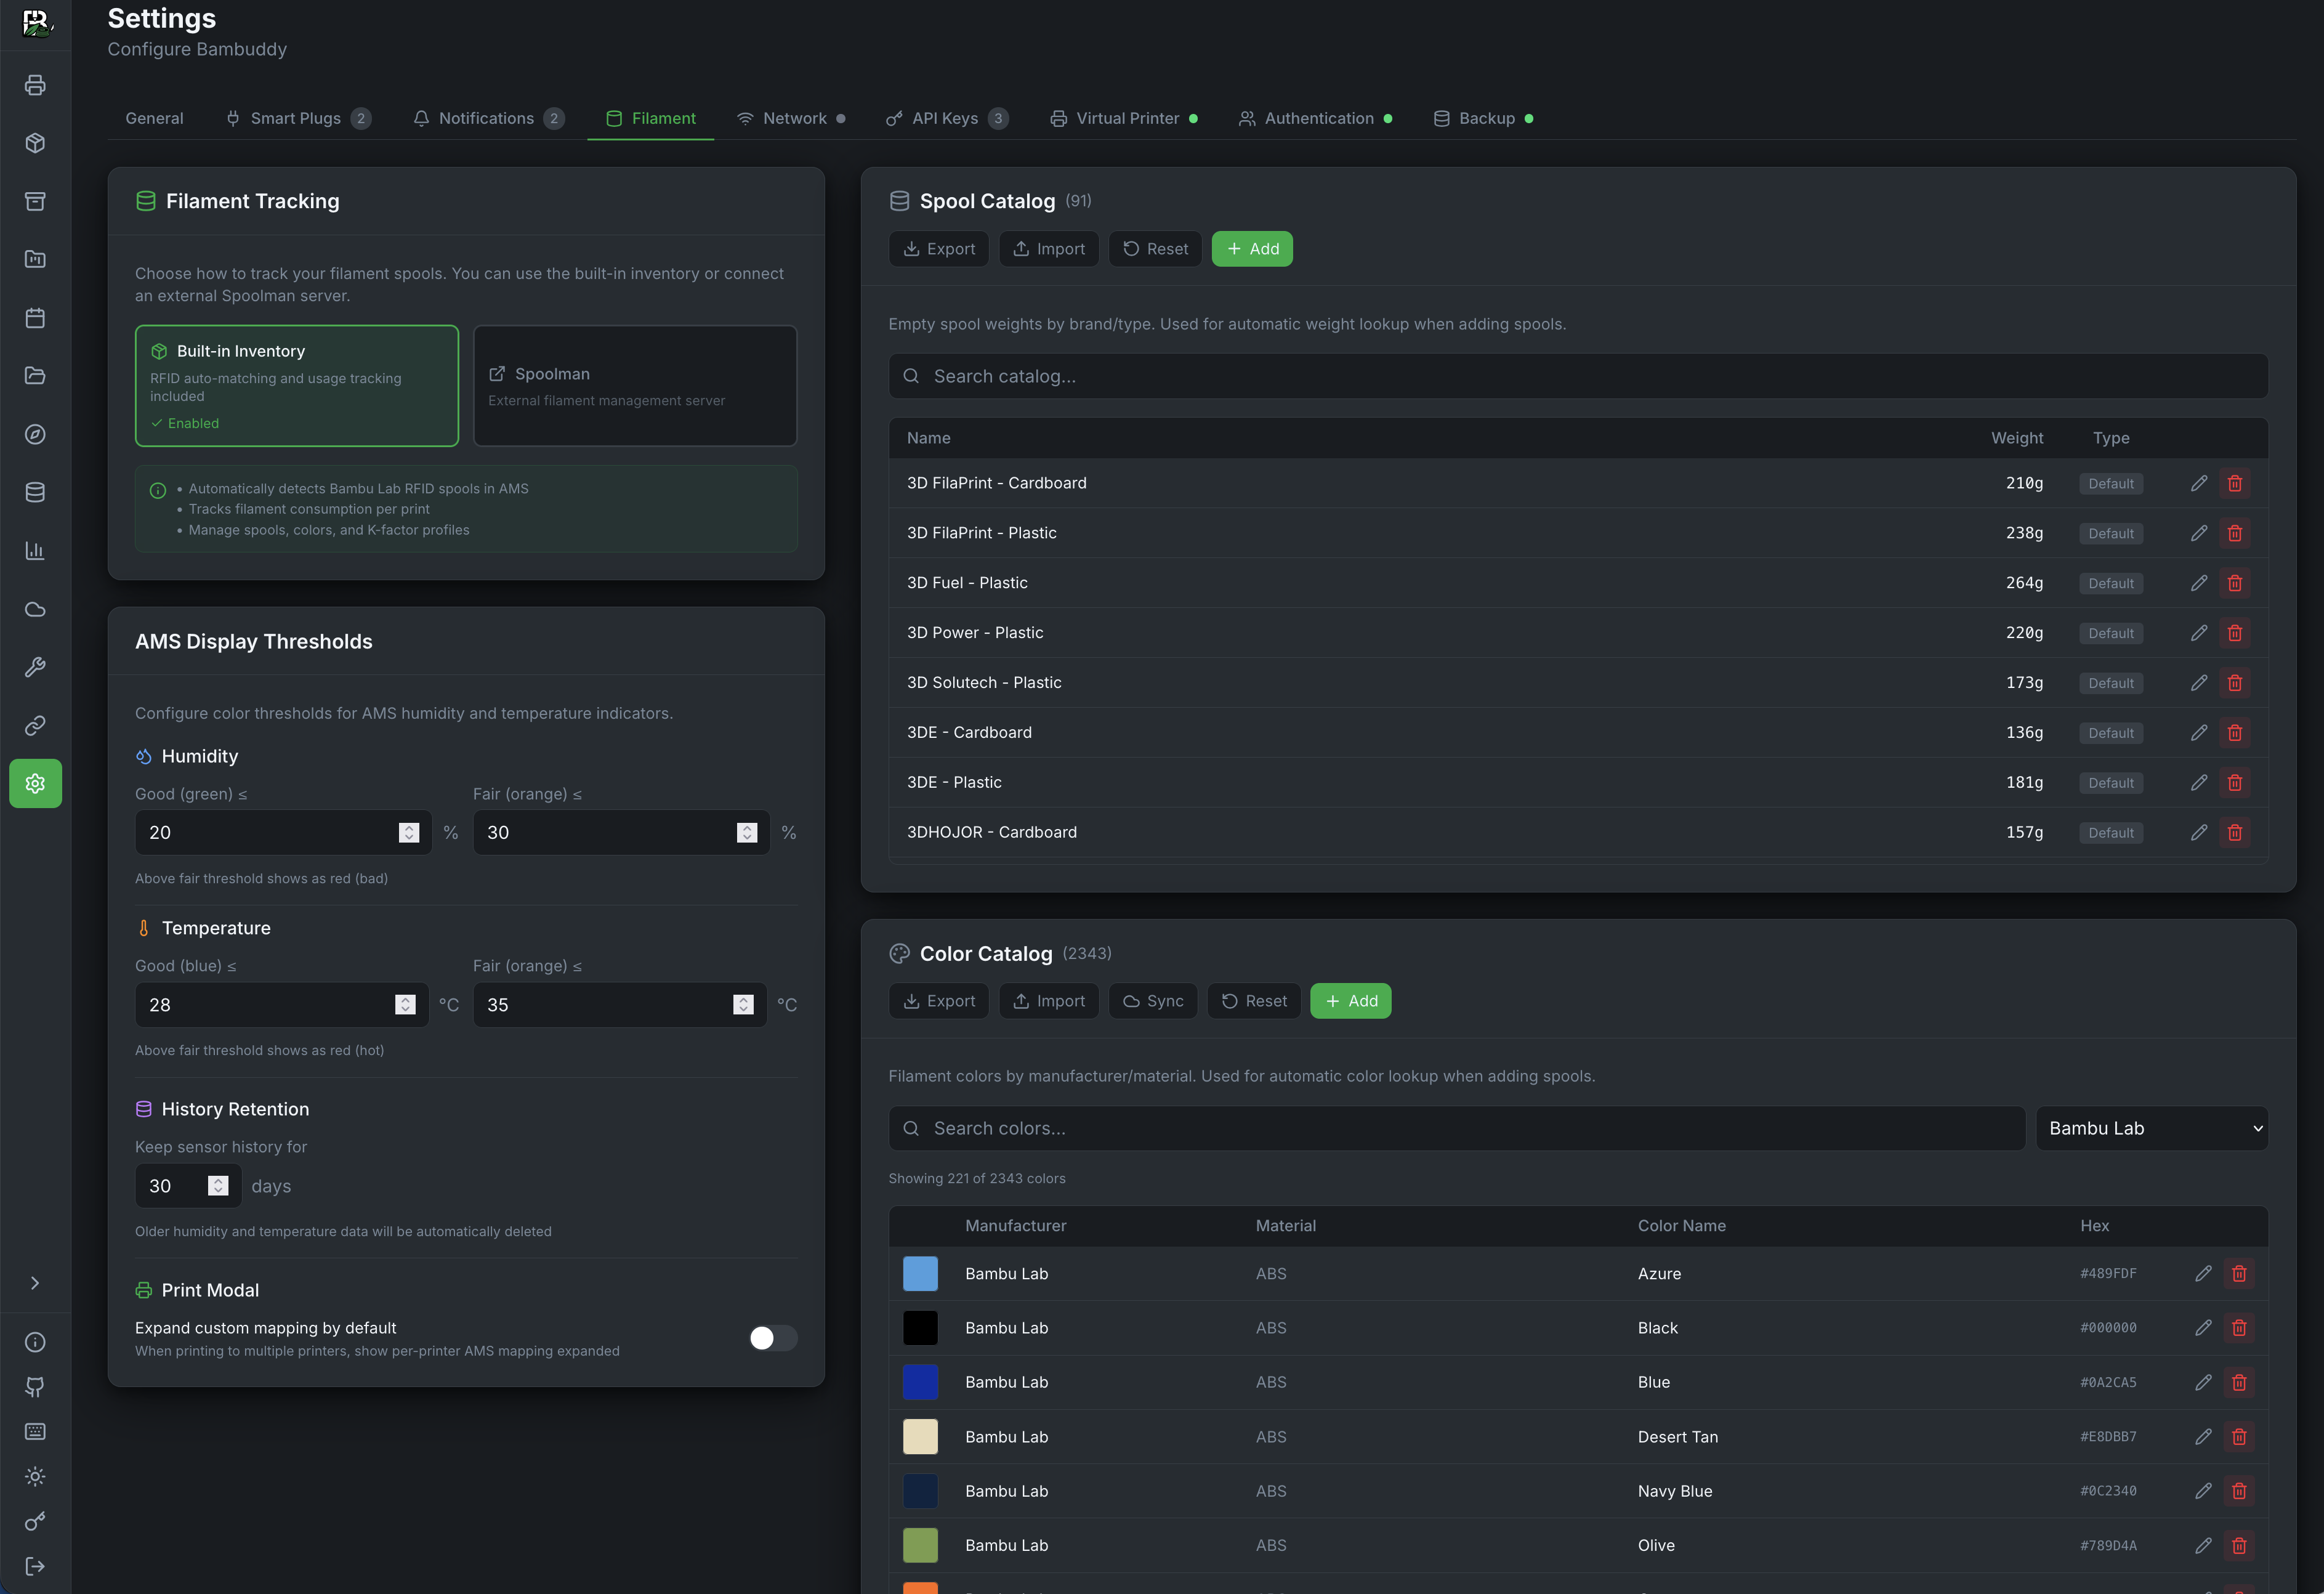
Filament Tracking
Choose between:
- Built-in Inventory — Use Bambuddy's spool management
- Spoolman — Use external Spoolman integration
Sync Weights from AMS
When using built-in inventory, a Sync Weights from AMS button appears below the mode selector. This force-syncs all inventory spool weights from the live AMS remain% sensor values of connected printers.
Use this to recover from corrupted weight data — for example, if a printer power-off event caused all spool fill levels to drop to zero. The sync overwrites the stored weight_used values with the current AMS readings. Printers must be online for the sync to work.
Low Resolution
AMS remain% is integer-precision (1% steps = ~10g for a 1kg spool). For precise tracking, rely on the automatic 3MF-based usage tracker during normal printing. Use AMS sync only as a recovery tool.
Spool Catalog
Pre-defined empty spool weights for quick selection when adding spools. Ships with 90+ entries covering common manufacturers.
| Button | Description |
|---|---|
| Export | Download the catalog as a JSON file for backup or sharing |
| Import | Load a JSON file to add entries. Duplicates (same name) are skipped automatically |
| Reset | Restore the built-in default catalog (overwrites all entries) |
| + Add | Manually add a new spool weight entry |
Color Catalog
Pre-defined color palettes from filament brands. Ships with 600+ colors across 20 brands. Used in the color picker when adding or editing spools.
| Button | Description |
|---|---|
| Export | Download the entire catalog as a JSON file |
| Import | Load a JSON file to add colors. Duplicates (same manufacturer + color name + material) are skipped |
| Sync | Fetch new colors from FilamentColors.xyz — a community database of measured filament colors. Only adds new entries, never modifies existing ones |
| Reset | Restore the built-in default catalog (overwrites all entries) |
| + Add | Manually add a new color entry with manufacturer, color name, hex code, and material |
Import File Format
Both catalogs accept a JSON array. Spool catalog entries:
Color catalog entries:
[
  { "manufacturer": "eSUN", "color_name": "Silk Gold", "hex_color": "#C48E2F", "material": "PLA Silk" }
]
Community Sharing
Use Export to share your catalog with others, and Import to load shared catalogs. This is useful for adding colors from brands not yet in the default database.
FAQ
My material isn't in the dropdown (e.g., PCTG, PHA, PP)
Type the material name directly into the Material field. A green "Use custom material" option appears at the bottom of the dropdown. Custom materials work the same as built-in ones for all tracking features.
Do I need to pick a filament profile for every spool?
No. Use Quick Add (Stock) mode to add spools with just a material type — no slicer preset, brand, or subtype required. Stock spools track weight, usage, and cost just like configured spools, but they aren't linked to a printer filament profile. You can filter stock spools on the inventory page and edit them later to assign a profile when needed.
In full mode, the Slicer Preset field is required. It links the spool to a filament profile ID that the printer understands. If you're just inventorying filament for tracking purposes, pick the closest available preset — for example, use a generic "PETG Basic" preset for a third-party PETG spool.
If you have custom slicer profiles (e.g., a PCTG profile in OrcaSlicer), import them via Local Profiles so they appear in the preset dropdown.
I have different printers (P1S, H2D) and nozzles — do presets matter?
The spool inventory itself is printer-agnostic. You can add a spool once and assign it to any printer's AMS slot. Printer model filtering only applies when configuring an AMS slot (telling the printer which profile to use), not when adding spools to inventory.
When you configure an AMS slot, the preset list is automatically filtered by that printer's model — so you'll only see P1S-compatible presets when configuring a P1S slot, and H2D-compatible presets when configuring an H2D slot.
Is inventory only for loaded filaments?
No. The inventory tracks all your spools — loaded and unloaded. You can add every spool you own to the inventory, even spools sitting on a shelf. The "In Printer" summary card shows how many are currently loaded in AMS slots, but unloaded spools are tracked just the same (weight remaining, usage history, cost, etc.).
Where do the "Slicer Preset" profiles come from?
They come from three sources, checked in order:
- Your Bambu Cloud account — if you've logged in via Cloud Profiles, all your synced filament presets appear (including custom ones you've created in BambuStudio or OrcaSlicer and synced to cloud)
- Local OrcaSlicer imports — if you've imported
.orca_filament,.bbscfg, or.bbsflmtfiles via Local Profiles - Built-in fallback table — ~150 Bambu Lab filament IDs that are always available, no login needed
If you're not logged into Bambu Cloud, you'll still see local imports and the built-in table.
What's the difference between "Assign Spool" and "Configure Slot"?
| Action | What it does | Affects printer? |
|---|---|---|
| Assign Spool | Links an inventory spool to an AMS slot for tracking (weight, usage, cost) and auto-configures the slot with the spool's filament profile, color, and K-profile | Yes |
| Configure Slot | Manually sends a specific filament profile to the printer (temperatures, flow, pressure advance) | Yes |
Assigning a spool is the simplest workflow — it handles both tracking and printer configuration in one step. Use "Configure Slot" when you want to manually override settings or set up a slot without an inventory spool.
Tips
Weigh Your Spools
For the most accurate remaining weight, weigh the full spool on a kitchen scale and subtract the empty spool weight. Enter this as the remaining weight when adding a new spool.
Low Stock Alerts
Keep an eye on the "Low Stock" summary card. Spools below 20% remaining are flagged so you can reorder before running out.
PA Profiles
Link K-factor profiles to your spools so the correct pressure advance settings are always associated with each filament.
Third-Party Filament Workflow
For non-Bambu filaments: 1) Add the spool to inventory (pick the closest preset, type custom material/brand) → 2) Load the spool in the AMS → 3) Assign the spool to the slot on the printer card → 4) Configure the slot with the correct filament profile. This gives you both accurate tracking and correct print settings.